
- Published on
Dynamic PostgreSQL database credential generation with HashiCorp Vault
- Authors

- Name
- Tamas Neumer

Intro
Developers often request read-only credentials to the database. Using HashiCorp Vault database administrators can enable developers to dynamically generate such short-lived credentials. The main benefits of this are:
- Each developer receives a unique username/password pair.
- The credential's lifetime is configurable and it's often short lived.
- Using Role Based Access Control (RBAC) and Vault Policies administrators can specify who can request such credentials
- Requesting such a credential is bound to a "lease", which uniquely identifies the user who requested the credential, therefore credential requests and all consecutive actions are traceable.
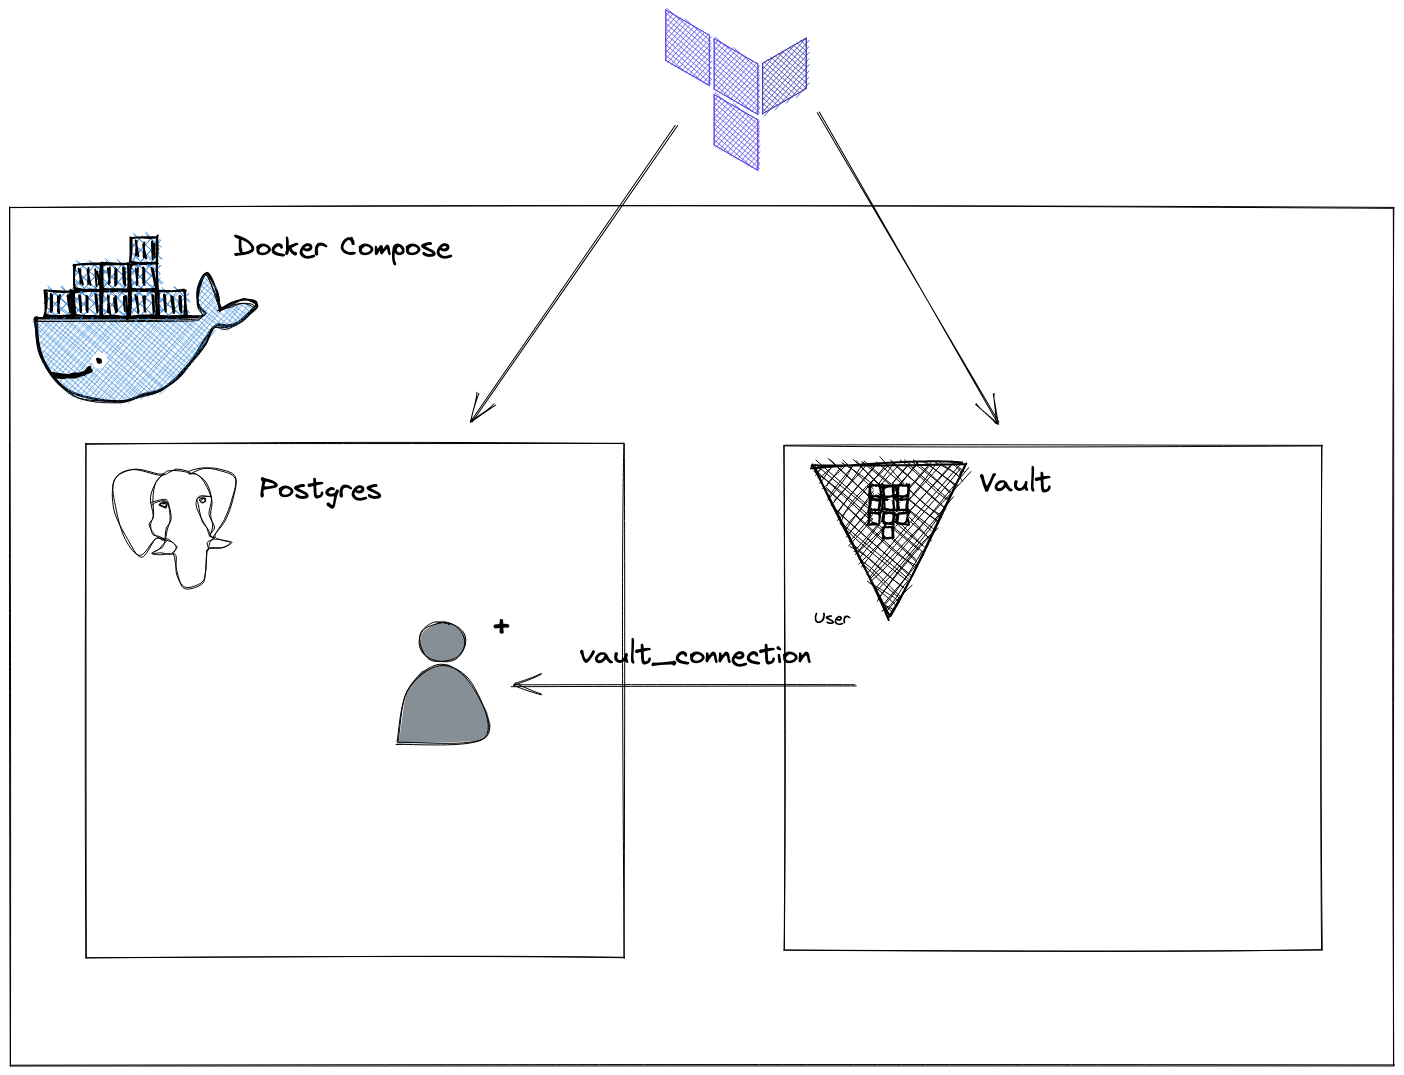
In the following Vault and PostgreSQL instances are started in docker-compose and these are then configured for read-only dynamic credential generation using Terraform.
Infrastructure Setup
Docker-compose
First create the following folder structure next to the docker-compose.yml file:
├── docker-compose.yml
└── volumes
    └── vault
        ├── config
        │   └── vault.json
        ├── file
        └── logs
Populate ./volumes/vault/config/vault.json with the following configuration:
{
  "backend": {
    "file": {
      "path": "/vault/file"
    }
  },
  "listener": {
    "tcp":{
      "address": "0.0.0.0:8200",
      "tls_disable": 1
    }
  },
  "ui": true
}
Populate docker-compose.yml with:
version: '3.8'

volumes:
  postgres_data:
    driver: local

services:
  postgres:
    # https://hub.docker.com/layers/postgres/library/postgres/14.1-alpine/images/sha256-884c142deb4a141f67489c807534ec6139f13b9a6432d2f87a4de283aaec0b5c?context=explore
    image: postgres@sha256:884c142deb4a141f67489c807534ec6139f13b9a6432d2f87a4de283aaec0b5c
    ports:
      - '5432:5432'
    volumes:
      - postgres_data:/var/lib/postgresql/data
    environment:
      POSTGRES_DB: postgres
      POSTGRES_USER: postgres
      POSTGRES_PASSWORD: postgres
  vault:
    #Version 1.2.2 - https://hub.docker.com/layers/vault/library/vault/1.9.2/images/sha256-120f43bbc0ee041245631b78e6287e93861ae73674c034e4882bdc30290cf638?context=explore
    image: vault@sha256:120f43bbc0ee041245631b78e6287e93861ae73674c034e4882bdc30290cf638
    container_name: vault
    ports:
      - '8200:8200'
    restart: always
    volumes:
      - ./volumes/vault/logs:/vault/logs
      - ./volumes/vault/file:/vault/file
      - ./volumes/vault/config:/vault/config
    cap_add:
      - IPC_LOCK
    entrypoint: vault server -config=/vault/config/vault.json
The docker-compose.yml defines the two containers and both container's port is mapped to the local machine's corresponding port. Start it with docker-compose up. Assure that everything is running properly by:
- Checking Vault in the browser at
http://localhost:8200. On the first login you are asked to define the number of shards the master key will be split into. For simplicity use1and use1also as the key threshold. Save the presented master token and the shard to a text-file. In the next step, unseal Vault with the single shard and log in using the root token. - Check Postgres by connecting to it from the CLI:
psql "host=localhost port=5432 dbname=postgres user=postgres"
Configuring Vault and Postgres using Terraform
Provider configuration
In a separate folder create the following files:
├── main.tf
├── role-setup.sql
└── vault-postgres.tf
In the main.tf define providers and variables:
terraform {
  required_providers {
    postgresql = {
      source = "cyrilgdn/postgresql"
			version = "~> 1.15.0"
    }
    vault = {
      source = "hashicorp/vault"
			version = "~> 3.2.1"
    }
  }
  required_version = ">= 1.0"
}


provider "postgresql" {
  host            = "127.0.0.1"
  port            = 5432
  database        = "postgres"
  username        = "postgres"
  password        = "postgres"
  sslmode         = "disable"
}

provider "vault" {
  address = "http://localhost:8200"
  token   = var.vault_token
}

variable "vault_token" {
	description = "Vault token used by terraform"
}
In order not having to pass the token each time a terraform command is executed the token can be set as an environment variable: export TF_VAR_vault_token=<root-token>
Postgres configuration
For the dynamic credential generation Vault will require a connection to the database. For this reason, a dedicated user (vault_connection) is created in
Postgres with CREATEROLE capability. The initial password for this role is generated by the random_password
block and it's result is passed to postgresql_role.postgres_vault_connection block, which in turn creates the role in Postgres. Once the dynamically create role's lifetime
expires, the vault_connection will need to terminate the connection to the database. For this reason, vault_connection will be a member of the pg_signal_backend group.
To avoid the vault_connection role having to explicitly set the pg_signal_backend role (SET ROLE pg_signal_backend;) each time it terminates the connection, it is created
with the INHERIT option set to true.
Making sure that the dynamically created roles have only read access is done the following way:
- A
devgroup is created. All dynamically created roles will belong to this group later. In order to all members of thedevgroup to have the capabilities assigned to the group itself,INHERITis set totruehere as well. - On the
publicschema all capabilities are revoked from thepublicgroup. Therefore, without explicit grant, no user can do anything on it. - The
devgroup is then carefully granted read-only permissions on objects (e.g.: tables) of thepublicschema. - In our case the
posrtgresuser is the one creating database objects (and eventually doing migrations). The developer roles created in the future must have access to all existing database objects as well as to objects that are created in the future. This is achieved by altering the default privileges of thepostgres user.
Populate vault-postgres.tf with:
locals {
	pg-vault-connection = "vault_connection"
}

resource "random_password" "postgres_vault_init_password" {
  length  = 16
  special = true
}

resource "postgresql_role" "postgres_vault_connection" {
  name        = local.pg-vault-connection
  inherit     = true
  login       = true
  password    = random_password.postgres_vault_init_password.result
  create_role = true

  roles = ["pg_signal_backend"]

  skip_reassign_owned = true
}

resource "postgresql_role" "postgres_dev_role" {
  name    = "dev"
  inherit = true
  login   = false
  skip_reassign_owned = true
}

resource "null_resource" "policy-role-setup" {

  depends_on = [postgresql_role.postgres_dev_role]

  provisioner "local-exec" {
    command = "psql -h 127.0.0.1 -p 5432 -U \"postgres\" -d postgres -f \"role-setup.sql\""
    environment = {
      PGPASSWORD = "postgres"
    }
  }
}
The SQL script responsible for configuring the privileges is executed by the null_resource Terraform block. The content of role-setup.sql is:
REVOKE ALL ON SCHEMA "public" FROM PUBLIC;

GRANT USAGE ON SCHEMA "public" TO "dev";
GRANT EXECUTE ON ALL FUNCTIONS IN SCHEMA "public" TO "dev";

ALTER DEFAULT PRIVILEGES FOR ROLE "postgres" IN SCHEMA "public" GRANT SELECT ON TABLES TO "dev";
ALTER DEFAULT PRIVILEGES FOR ROLE "postgres" IN SCHEMA "public" GRANT USAGE, SELECT ON SEQUENCES TO "dev";
ALTER DEFAULT PRIVILEGES FOR ROLE "postgres" IN SCHEMA "public" GRANT EXECUTE ON FUNCTIONS TO "dev";
ALTER DEFAULT PRIVILEGES FOR ROLE "postgres" IN SCHEMA "public" GRANT USAGE ON TYPES TO "dev";
At this point if terraform init + terraform apply is executed then we will see the role created in Postgres:
psql "host=localhost port=5432 dbname=postgres user=postgres"

postgres=# postgres=# \du
                                            List of roles
    Role name     |                         Attributes                         |      Member of
------------------+------------------------------------------------------------+---------------------
 dev              | Cannot login                                              +| {}
                  | Password valid until infinity                              |
 postgres         | Superuser, Create role, Create DB, Replication, Bypass RLS | {}
 vault_connection | Create role                                               +| {pg_signal_backend}
                  | Password valid until infinity                              |
Vault configuration
Vault is configured in three steps:
- A Vault mount is created (
vault_mount). Thevault_mountdefines the type of the underlying secret engine, in this case "postgres". - Vault is configured so that it can connect to the database (
vault_database_secret_backend_connection).allowed_rolesis set todev, as it must match the name of thevault_database_secret_backend_rolecreated by the next Terraform resource.- Due to docker-compose's networking, from Vault's perspective the host name of the database will be
postgres, as this was the name used in thedocker-compose.yml, when we definedpostgresas a service. - The
vault_database_secret_backend_connectionis the passed the username/password which were created earlier.
- Finally, Vault is told how it is supposed to create/revoke dynamically created roles (
vault_database_secret_backend_role).- Each time a dynamic secret is create Vault issues an associated lease. The lease's
default_ttlspecifies a time window after which the lease needs to be extended for the credentials to work further. If this doesn't happen, the lease expires and the dynamically created role is revoked. Since we didn't want to bother developers with manually extend the lease periodically, its value was set to match themax_ttl, which specifies the maximum timespan of the lease. In this case the lease expires after one hour and Vault will terminate the connection and revoke the role using a series of SQL statements defined in therevocation_statementsproperty.
- Each time a dynamic secret is create Vault issues an associated lease. The lease's
Append the following to vault-postgres.tf:
resource "vault_mount" "db" {
  path = "postgres"
  type = "database"
}

resource "vault_database_secret_backend_connection" "postgres-backend-connection" {

  backend       = vault_mount.db.path
  name          = "postgres-vault-backend-connection"
  allowed_roles = ["dev"]

  postgresql {
    connection_url = "postgres://{{username}}:{{password}}@postgres:5432/postgres?sslmode=disable"
  }

  data = {
    username = local.pg-vault-connection
    password = random_password.postgres_vault_init_password.result
  }
}

resource "vault_database_secret_backend_role" "dev_role" {
  backend     = vault_mount.db.path
  name        = "dev"
	# This one must match the name of our vault_database_secret_backend_connection
  db_name     = vault_database_secret_backend_connection.postgres-backend-connection.name
  default_ttl = "3600"
  max_ttl     = "3600" #1h
  creation_statements = [
    # Create role and alter search path
    "CREATE ROLE \"{{name}}\" IN ROLE \"dev\" LOGIN PASSWORD '{{password}}' VALID UNTIL '{{expiration}}';"
  ]
  revocation_statements = [
    # Forcefully terminate user connection to postgres. For this the vault_provisioner must be member of pg_terminate_backend role. (Granted by policy setup)
    "SELECT pg_terminate_backend(pg_stat_activity.pid) FROM pg_stat_activity WHERE pg_stat_activity.usename = '{{name}}';",

    # DROP ROLE
    "DROP ROLE IF EXISTS \"{{name}}\";"
  ]
}
At this point dynamic credentials may be generated in the Vault UI's console, by running the following command: vault read postgres/creds/dev. (The command
always takes the following form: vault read <mount>/creds/<role-name>).
Testing
In one terminal window connect to Postgres using the (root) postgres user (psql "host=localhost port=5432 dbname=postgres user=postgres"). Then fetch a new username/password from the
Vault UI using vault read postgres/creds/dev and using this connect form another terminal (e.g.: psql "host=localhost port=5432 dbname=postgres user=v-root-dev-HN5ppuRrbK7kNyQL59eZ-1644357243").
When attempting to create objects (for example a table) using the dynamically created user, it will fail.
postgres=> create table t1 (id int);
ERROR:  permission denied for schema public
LINE 1: create table t1 (id int);
However, with the postgres user we can perform this action and also populate the table with some data.
postgres=# create table t1 (id int);
CREATE TABLE
postgres=# insert into t1 values (1);
INSERT 0 1
postgres=#
The dynamic user can read from table t1, however it can't write to it:
postgres=> select * from t1;
 id
----
  1
(1 row)

postgres=> insert into t1 values (2);
ERROR:  permission denied for table t1
What happens if the lease (1h) expires? In this case Vault terminates the client's connection and drops the role, as seen in the revocation_statements block of the vault_database_secret_backend_role
resource. To test this, the lease can be manually revoked in the Vault UI: (Access/Leases/postgres/creds/dev => select and revoke lease)
When heading back to the dynamically generated user's postgres terminal we will see that upon the next statement execution we get an error:
postgres=> select * from t1;
FATAL:  terminating connection due to administrator command
server closed the connection unexpectedly
	This probably means the server terminated abnormally
	before or while processing the request.
The connection to the server was lost. Attempting reset: Failed.
Closing Remarks
In this article we have seen how to dynamically generate read-only Postgres credentials with a limited lifespan. These are excellent for developers to take a look into the database or to run some queries and begs to question whether these are suitable for containerized applications as well. In our experience these are, however developers need to dedicate special attention to the following:
- The Vault Agent Sidecar Injector needs to be continuously running next to your container. This writes the (current) username/password to to a file, which then needs to be read by the application container.
- When the lease has reached its
max_ttl, Vault rotates the user: a new username/password pair is generated. At this point either the application needs to realize that the file's content has been changed and there are new credentials available, or the sidecar injector must be configured to notify the application. - The application must gracefully drain its connection pool and start a new one using the new credentials. While doing so it should not accept any new requests.
Not an impossible, but not an easy task. In our experience developers found it easier to work with non-changing credentials in their applications. In such cases the username/password can be simply written to a Vault key-value (KV2) store and then the secret is injected at container creation time by the Vault Agent.